

Correct setup of an alternating pressure mattress begins before the pump is switched on. The mattress must match the bed frame, the air hoses must remain open as the bed moves, the pump must have safe ventilation and power, and the system must complete its initial inflation without an unresolved alarm.
A consistent setup routine makes faults easier to identify and gives each shift a clear starting point. Always use the instructions supplied with the exact mattress and pump, because connector designs, inflation times, control panels, pressure ranges, and alarm reset procedures vary by model.
1. Confirm the Mattress Type Before Unpacking
First determine whether the system is an overlay or a mattress replacement. An overlay is normally placed on top of a compatible support mattress. A replacement system is designed to take the place of the existing mattress and sit on the bed deck. Installing one as the other can change bed height, side-rail clearance, stability, and support.
Information to Check
- Mattress model, pump model, and connector compatibility.
- Overlay or full replacement configuration.
- Mattress length, width, and depth compared with the bed platform.
- Stated user weight range and any model-specific pressure guidance.
- Bed-frame type, articulation points, mattress retainers, and side-rail arrangement.
- Power supply requirements and the location of an accessible outlet.
Keep the product instructions beside the bed during setup. A facility checklist should support those instructions, not replace them.
2. Unpack and Inspect Every Component
Open the packaging in a clean, dry area and compare the contents with the packing list. Avoid using a blade close to the cover, air cells, hoses, or power cable. Let a tightly packed mattress unfold naturally before forcing it flat.
Pre-Installation Inspection
- Check the cover, seams, zipper, air cells, base, and fixing straps for damage.
- Locate the head and foot ends and identify the intended upper surface.
- Find the CPR control and confirm that it closes fully.
- Inspect hose connectors for cracks, bent fittings, contamination, or missing seals.
- Check the pump housing, hooks or feet, filter cover, power cord, plug, display, and controls.
- Confirm that cleaning and pre-use preparation have been completed under the facility procedure.
Do not continue with a visibly damaged component or an unmatched pump and mattress. Isolate it for inspection rather than attempting a temporary repair at the bedside.
3. Inspect the Bed Frame and Surrounding Area
Apply the bed brakes and remove the existing mattress only when the selected system requires it. The bed deck should be clean, dry, and free from sharp edges or loose hardware. Confirm that the mattress retainers are present and that the platform dimensions suit the new surface.
Check the complete range of bed movement before placing the mattress. Raising the backrest, bending the knee section, changing height, or extending the bed must not trap a hose, pull a strap, or expose an unsafe gap. Side rails and transfer aids should also be assessed with the final mattress height, not the empty bed frame.
4. Position and Secure the Mattress
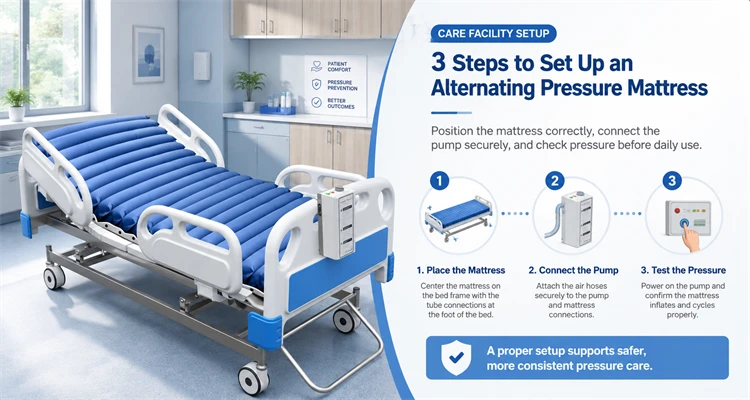
Place the mattress with the labelled upper surface facing up and the head and foot ends in the correct orientation. On most systems, the hose set exits near the foot end so it can reach the pump without crossing the sleeping surface.
Secure alternating pressure mattress systems only at the fixing points identified by the manufacturer. Straps should hold the base against the correct bed section without wrapping around moving linkages, side rails, electrical cables, or actuators.
Bed Movement Check
- Profile the bed slowly through its normal positions.
- Confirm that the mattress remains centred inside its retainers.
- Check that straps do not tighten as the backrest or knee section moves.
- Verify that hoses remain clear of wheels, castors, rails, and pinch points.
- Recheck side-rail clearance and access for transfer equipment.
5. Close the CPR Control and Connect the Air Hoses
Before inflation, place the CPR control in its normal closed or operating position. An open or partly engaged CPR valve is a common reason a mattress will not reach pressure.
Align the hose connector with the correct pump port and press it in until the locking feature engages. Where ports or hoses are colour-coded, match them exactly. Do not twist the tubing to make the connector fit.
Hose Connection Check
- Each connector is fully seated and locked.
- The hose run has no sharp bend, twist, compression, or visible damage.
- There is enough slack for normal bed articulation without forming a floor loop.
- The hose does not pass beneath the mattress, through a side rail, or near a castor.
- A gentle pull does not release the connector.
6. Position the Pump and Arrange the Power Cable
Mount the pump on the bed using its approved hooks or place it feet-down on a stable surface, according to the product instructions. Keep ventilation openings clear and leave the display, alarm indicators, filter access, and controls visible.
Route the cable so that it cannot be crushed by the bed, caught by a wheel, stretched during height adjustment, or create a trip hazard. Connect medical air mattress pumps to the specified supply and an accessible outlet. Where the instructions require continuous power, avoid an outlet controlled by a wall switch and do not use an unapproved extension lead or adaptor.
Keep the pump away from wet cleaning areas and do not cover it with bedding. Confirm that staff can disconnect the plug without moving the occupied bed in an emergency.
7. Start the System and Allow Full Initial Inflation
Switch on the pump and observe its self-test, display, and alarm indicators. A low-pressure signal can be normal while an empty mattress inflates, but it should clear when the system reaches its operating state. Initial inflation time is model-specific, so use the ready indicator or the stated setup time rather than assuming that every system inflates in the same number of minutes.
Unless the product instructions provide a different procedure, complete the initial inflation before placing the resident on the surface. Inspect the mattress from head to foot for even shape, disconnected sections, unusual air loss, or a cell that remains flat.
8. Select the Initial Pressure and Operating Mode
Controls vary. A pump may use a weight range, numbered pressure level, soft-to-firm dial, automatic sensing function, or a combination of these. Start with the setting specified for the user and system, then assess support using the method in the product instructions and the facility care plan.
- Confirm that alternating mode is active when it is the intended routine mode.
- Use maximum-inflate, transfer, or firm mode only for the task and duration described for that model.
- Return the pump to the planned operating mode after repositioning, care, or transfer.
- Reassess support after a major change in user weight, bed angle, posture, or clinical condition.
- Do not assume that the same dial position gives equivalent support on another pump model.
If the user appears too deeply immersed, unstable, or insufficiently supported, stop and recheck the selected model, weight setting, connections, inflation status, and instructions before use continues.
9. Add Bedding Without Restricting the Surface
Use a clean, light, loose-fitting sheet that can follow the movement of the air cells. Smooth out wrinkles and keep the hose connection and CPR control accessible. If an incontinence layer is needed, use the approved type and avoid building a thick stack between the user and the mattress.
Tightly stretched sheets, folded blankets, thick pads, and multiple absorbent layers can reduce immersion and change how the surface responds. Bedding should also stay clear of the pump ventilation openings and alarm display.
10. Complete the First-Run Acceptance Check
Treat the first run as a short acceptance test. The following checks should be completed before the setup is handed over to routine care.
| Check Point | Acceptable Setup | Action if Not Acceptable |
|---|---|---|
| Bed compatibility | Correct overlay or replacement arrangement with safe dimensions | Stop and confirm the intended bed and mattress combination |
| Orientation | Head, foot, upper surface, and hose exit are correctly positioned | Reposition before inflation or user placement |
| Fixing straps | Secure at approved points and free during bed movement | Release and refit away from moving parts |
| CPR control | Closed and fully engaged for normal operation | Close correctly and restart the inflation check |
| Air hoses | Locked, untwisted, undamaged, and clear of pinch points | Reconnect or replace the affected component |
| Pump and power | Stable, ventilated, visible, and safely connected | Move the pump or reroute the cable |
| Inflation and alarms | Mattress fully inflated with no unresolved indicator | Check valve, hoses, cells, filter, and instructions |
| Pressure and mode | Setting matches the current plan and model guidance | Correct the setting and reassess support |
| Bedding | Light, smooth, dry, and clear of controls and ventilation | Remove excess layers and remake the bed |
11. Observe the First Operating Cycle
After transfer, confirm that the user is centred and that tubing, clothing, and bedding are clear. Check the selected mode, pressure setting, bed angle, side-rail arrangement, and access to the nurse call system. Observe at least one operating cycle or the model-specific commissioning period so that leaks, persistent alarms, or incorrect mode selection are found before staff leave the bedside.
If the bed is repositioned, repeat the hose and cable check. A connection that is clear when the bed is flat may become trapped when the backrest rises or the bed lowers.
12. Document the Setup and Hand Over to Staff
- Mattress and pump model, asset number, and setup date.
- Overlay or replacement configuration and bed identification.
- Initial pressure setting, operating mode, and alarm status.
- CPR control location and the model-specific emergency procedure.
- Instructions for transfer or firm mode and returning to alternating mode.
- Routine cleaning, filter, hose, cover, and power-cable checks.
- Action to take after a power interruption or persistent alarm.
- Service contact and location of the product instructions.
Handover should include a brief demonstration rather than only a signed form. Staff should be able to identify the normal display, locate the CPR control, silence and investigate an alarm correctly, and recognise when the system should be removed from service.
Common Setup Errors to Avoid
- Placing a replacement mattress on top of the original mattress.
- Installing an overlay without the required support mattress underneath.
- Leaving the CPR control open after unpacking or testing.
- Routing hoses or cables through moving parts of a profiling bed.
- Securing straps around side rails, actuators, or movable deck sections.
- Covering the pump or placing it where an alarm cannot be seen or heard.
- Transferring the user before the model-specific ready state is reached.
- Leaving the system in transfer, maximum-inflate, or static mode after the task ends.
- Using thick bedding layers that restrict the response of the surface.
Conclusion
A reliable alternating pressure mattress setup follows a clear sequence: confirm compatibility, inspect the equipment, prepare the bed, secure the mattress, close the CPR control, connect the hoses, position the pump, complete inflation, select the correct setting, add minimal bedding, and verify the first operating cycle.
Using the exact model instructions alongside a facility checklist helps make each installation repeatable. It also gives staff a documented baseline for later alarm investigation, cleaning, maintenance, and shift handover.
FAQ
How Long Initial Inflation Usually Takes
Inflation time depends on mattress volume, pump output, connector design, and model. Use the stated setup time or ready indicator for the exact system, and investigate if a low-pressure alarm remains after that point.
Whether a Resident Can Be Placed on the Mattress During Inflation
Follow the model instructions. Many systems require full initial inflation before user placement, while some provide a specific setup or rapid-inflate procedure. Do not guess from another model.
Where the Pump Should Be Positioned
Use the approved bed hooks or a stable feet-down surface. Keep the pump ventilated, dry, visible, accessible, and clear of bed movement, cleaning water, and loose bedding.
What Type of Sheet Works Best
A light, loose-fitting sheet allows the surface to move and conform. Keep layers smooth and minimal, and use only compatible covers or incontinence products specified by the facility and product instructions.
Why the Low-Pressure Alarm May Remain Active
Common causes include an open CPR control, an incomplete hose connection, twisted tubing, a damaged cell, an obstructed filter, or insufficient inflation time. Follow the model troubleshooting sequence and remove the system from use if the alarm cannot be resolved.


